Most architects, designers and engineers are aware of reality capture technology and laser scanning but might not be sure how it could fit into their workflow, especially when it comes to as-built documentation.
To get a better sense of how this technology works with as-built documentation, let’s first recap what reality capture means in the architecture, engineering, and construction (AEC) world. It’s a way to scan, accurately measure and document data about real-world conditions of any space or structure. The resulting data is known as a “point cloud.”
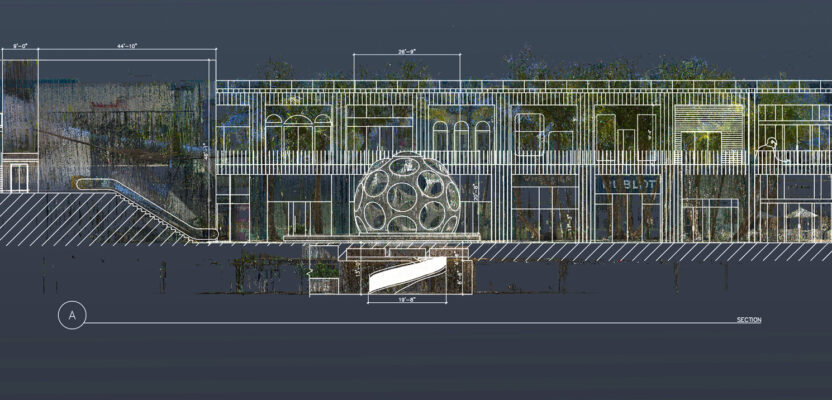
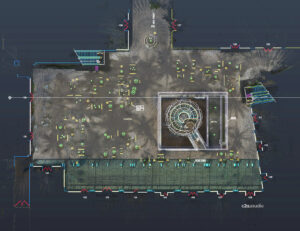 Point cloud data captured at the Miami Design District’s Palm Court using the Leica BLK2GO handheld scanner. A 12-minute walkthrough captured three levels with 30,000 square feet of space. The scan captured enough point cloud data to produce a 2D AutoCAD site plan and section cut, which could then produce a 3D as-built model in Revit, Sketchup or any other modeling software. See a video animation of point cloud.
You’ve probably heard the term “3D point cloud,” yet you’re not alone if you could benefit from a refresher. A 3D point cloud captured by a laser scanner is a set of data points that represent all surfaces, structures and objects around the scanner that were measured by the laser. The number of captured data points from a single scan often number in the millions or billions with multiple point clouds combined. Individual point clouds are often combined, or registered, to create a complete dataset of a larger space, such as an office building or complex.
Point clouds can be used for everything from building documentation, 2D CAD drafting, and 3D CAD modeling to duplicating parts and design materials for 3D printing. They’re also used for maintaining a highly accurate “digital blueprint” of a structure. And since point clouds give you immense amounts of measurement data, a powerful laptop or desktop computer is necessary to work with them.
That said, point clouds ensure excellent collaboration between various contractors, designers, and architects on a project since everyone can rely on the same measurement data. This eliminates errors in format conversion or discrepancies when each stakeholder captures their own measurements.
Using an example from the AEC world, let’s imagine you want to redesign a shopping center to accommodate local social distancing guidelines. You can use a laser scanner to capture the dimensions in 3D and then go back to the office to build out your design using the point cloud. Do you still use a 2D AutoCAD workflow? If so, the short answer is yes, you can slice the 3D scan data into 2D plans and sections.
Today’s Reality Capture Devices: Handheld, Autonomous, Accurate
One of the biggest budget erosion items for any job is mistakes due to inaccurate measurements. There was a time when going back to a job site for a second or third measurement was simply part of the job. This was largely due to the use of manual tools like tape measures or other inaccurate devices. Once you got back to the office, it wasn’t long before you realized you needed to return to the site because something was off or missing.
For example, some dimensions like curved walls, the bevel of a crown molding, a 20-foot ceiling height, or three-inch floor slope can’t be captured with manual tools. Depending on the location of the job and level of inaccuracies, fixing mistakes can eat up a lot of time and budget. It’s also a bit embarrassing to tell a client that the site needs to be re-measured. With reality capture, you get accuracy right the first time and detailed as-built documentation.
While most laser scanners are mounted on tripods, reality capture tools are constantly evolving. The form factor of laser scanners are getting smaller and more agile as they continue to be even more powerful in their speed and accuracy. Some are portable enough to fit in a backpack and agile enough to be handheld.
Since the data and measurements are captured digitally by any type of laser scanner, you can store records for future project changes that could happen in a day, year, or at any point in the future. These types of 3D datasets are valuable for building owners and operators to have on file.
You can also use laser scanners to document a space that hadn’t previously been accurately measured (or measured at all), and compare your data with older plans or measurements. You can even put together a timeline of a structure’s changes to better understand how to make design changes or renovations.
Six Steps for Using Reality Capture for As-Built Documentation
Here’s a step-by-step process for using handheld laser scanning to get as-built documentation that is accurate while creating a digital, historical record of a space.
- Determine your reason(s) for scanning. Handheld scanners can capture simple rooms or more complex shapes, depending on your technique. Knowing your purpose upfront will ensure you capture just what you need. Capturing too much data will increase your file sizes and processing time. Capturing too little will prevent you from reaching your documentation goals.
- Plan your start/end point. Walk through the path you plan to take with your scan. Are doors unlocked and pathways clear? Is there potential for anyone or anything to block your path? Are there stairwells or long hallways that require you to slow down for a consistent scan? Best to sort all of that out before starting your walk. For commercial or manufacturing facilities, it might be more time efficient to scan after hours.
- Communication your plan. Are workers present? Has everyone been expecting you? A quick pre-walk meeting can help you avoid obstacles or stopping to answer questions mid-scan.
- Be conscious of your pace and technique. Handheld scanning requires good technique for consistent point cloud capture, so try not to speed up or slow down your walk unless it’s intentional. A nice steady pace is best, but stairwells and hallways are better scanned when you slow down, or even pause every so often. Hold the scanner out away from your body so that you don’t block the laser and cameras. You can slow down to get a more dense point cloud in areas with more detail, or lift the scanner over your head to make sure you capture points behind you (which is useful for hallways). If you have to open a door while scanning, place your back to it as you open it. And you might want to use a different cell phone to monitor your scan so you can keep your regular phone on airplane mode during your walk.
- Get feedback from your drafter/modeler. After scanning, ask your drafter how the data helped them do their job. Was there enough point density to accomplish the task? Any anomalies? Your drafter will know what they need, and feedback from them can help improve your method of reality capture.
- Post Your Work. Sure, there are plenty of opinions out there, but some can be really valuable. If your project isn’t top secret government work, post some point cloud visualizations on social media to get feedback from your peers and even bring more visibility to your business. This will also help improve your technique on future scans.
Today’s professional grade stationary scanners are leapfrogging early, albeit clunkier versions that were expensive and required training and teams to capture and document a space. Now you can get handheld devices that continuously scan while you walk, allow you to work autonomously on a site, and pay for themselves within a few projects. You won’t need much training and you’ll spend much less time scanning. And you’ll drive more business.