Last year I posted about this awesome plugin called “QGIS2Threejs” [here] and how it was possible to quickly render 3D visualisations for free using the open source GIS, QGIS. At the time I fudged some wind turbines as it was impossible to import models. Furthermore, I avoided too much detail as any imagery would look poor when zoomed in. In short, it was good but was not an alternative to Esris’ CityEngine or a model you could build in Blender.
A year and a half later, it’s a different story [demo here].
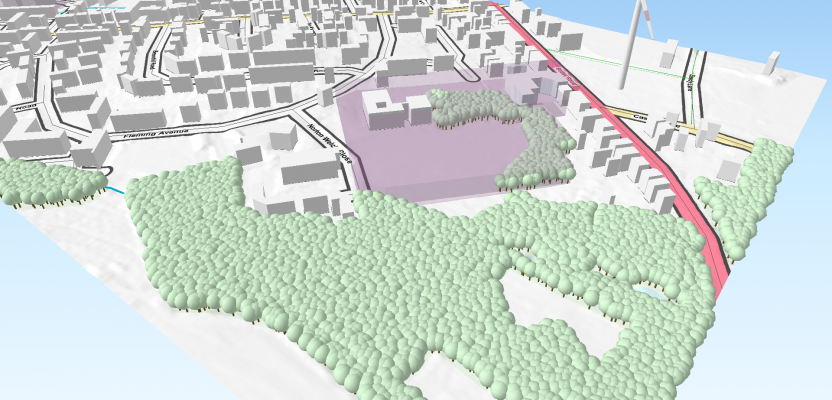
 The wind turbine is a model I built in SketchUp and exported as a Collada file, and the trees are created from Ordnance Surveys Open Map data (based on the woodland polygon). This is something that I could provide to a client with confidence to show how their issues interact.
 Note in the above picture how the trees have a slight randomness. I really liked the way this came out using the QGIS vector tools.
Below is a breakdown of the data and steps to reproduce it.
Software Required:
- QGIS 2.12
- SketchUp or Blender
Data Required:
- OS OpenMap
- Environment Agency Lidar DTM & DSM
Steps to Reproduce:
- Open QGIS and import the OS data, style either with the QLR styles provided by Ordnance Survey or Ross McDonald. Personally, I created my own based on the Ordnance Survey style as it is instantly recognizable.
- Using QGIS, bring in the DSM and intersect the height with the buildings to add a z value to the buildings. I found that adding this height as a field was good for checking later on. Make sure that you use a mean height for the buildings so that you don’t end up with strange-shaped roofs.
- Using only the woodland layer of the OS OpenMap data, convert to random points. Remember that your “average” tree is about 5m high and you want about 2m separation (radius).
 The regular points tool can be found in the ‘Vector’ tab under ‘research tools.’ Don’t be tempted to use the ‘random points’ tool, as it is quite tricky to set the density right for the varying polygon sizes. There is a tick box on the regular points so that some ‘randomness’ is generated.
- Create a new point shapefile. This will be used to provide a location for your turbine/model. Obviously, put the point(s) where you want your objects to be.
- Create or download your 3D objects. For this part, I made the turbine with SketchUp to the correct dimensions. The SketchUp 3D warehouse has a plethora of 3D models, cars, planes, a Back to the Future DeLorean …. they can all be exported in Collada format from SketchUp. Just ensure they are located correctly within the space – the model will render in reference to the point file you create, meaning that the point will be used as the models 0.0. You can also build models in Blender, AutoCAD or Threejs; as long as it is in Collada format, QGIS2Threejs can read it.
- Double up your trees! You need to have a trunk and a treetop; therefore, bring in the tree data again.
- Open QGIS2Threejs. It should be under the ‘Web’ tab in QGIS. If you don’t have it there, go and add it as a plugin.
- Okay, now for the fun part. Whatever is currently shown in the dataframe is what will be used as the image overlaid on the terrain, so tidy it up and consider that the buildings, trees, and model will sit on top (might be worth turning them off in the layers).
 Set your DEM to reference the DTM.
 - Here is where having two sets of trees comes in useful. Set your first set of trees as cylinders (as above). Set a radius of around 0.5 (assuming you are using a metric projection). Then set height to around 5-7m. I found that although the Institute of Architects recommend 7m, 6m worked well.
- For the second set of trees, set the object type to sphere, radius of 2mb and height the same as the trunk. Don’t forget to set the color to green and the trunk to brown!
- Set the buildings to the ‘Extruded’ object type and set the Height (NOT THE Z COORDINATE) to the height field you generated. You can also use the object geometry, though I find the field method more reliable.
- Set a file/folder location, and then sit back and enjoy!
But it’s no Esri CityEngine
True, this is not CityEngine, nor would it ever need to be. It is a FREE plugin for generating geographically correct 3D models. But, what if I told you that you could add buildings with shape? Companies like CyberCity3D sell 3D buildings and cities; therefore you can bring in more accurate buildings.
This is only the beginning for QGIS2Threejs. It is built on the rather amazing Threejs. Looking under the hood of the code, it is quite easy to add fog and shadows and adjust the angle of light. It wouldn’t take much for someone with a little more know-how in javascript to add a control for light depending on time of day.
One thing is for sure: this is a great little plugin, with a lot of potential.
Nick D