It’s not until you need it that you realize how much you miss it: such is the case with the Esri ArcGIS dynamic text functionality. On the surface it seemed easy to put a little reference into a text box, and then every time I opened a template or new map it would automatically show the user/coordinate system/date/time of print or any of a hundred plus options.
With a huge workload looming and setting up templates in QGIS, I turned to the text boxes to provide some small automation … and fell a cropper. That is not to say it can’t be done, but I am not a native coder, so I became stuck. How else do others put their coordinate systems on the map? Apparently the done thing is to write it all in the text box: not very efficient or cool for such a sophisticated piece of software. So I turned to Google+, and Lord Ninja of all that is QGIS [Nathan Woodrow] as always provided a solution.
As a starter for discussion I’ll outline what I have found so far, then if any of you awesome geoninjas and Q superusers have any code or further insight, you can help fill the gaps or provide snippets for the rest of us.
Date & Time Labels
![[% day( $now) %]/[% month( $now)%]/[% year( $now)%]](http://dragons8mycat.com/wp-content/uploads/2015/06/DateTime.png)
[% day( $now) %]/[% month( $now)%]/[% year( $now)%]
Date is one of the easier automatic attributes you can add. Open a new textbox and then insert expression.

On the right you will notice that you have a list of functions (as above). If we double-click “day” and then double-click “$now” (and then close with a bracket), we have
day($now)
If you select OK in the bottom right, you will see that you now have the day number in the textbox. We can therefore extend this to day, month, and year by copy and pasting this:
[% day( $now) %]/[% month( $now)%]/[% year( $now)%]
directly into the “main properties” box. Note here that the expression in the building looks different than the expression in the properties box.
Scale
There are two ways of doing this. The first is by using the method above and using the “$scale” referenced to a feature. The easiest way is by adding a scalebar. I know, just bear with me …

Select the “add new scalebar” option on the left, then create a box to place it (marquee an area). You’ll end up with a jumble/scalebar as indicated below.

Go to the properties on the right and select “numeric” as indicated above. You will then find the scalebar turns to scale TEXT. Just make sure that you reference it to the correct map frame!
Coordinate System
Okay, so this is where a little QPy is going to help. What I wanted from this was just the EPSG code as I figured that it would relate most of the primary parameters that were important. Then I found that there was a lot more that could be done.
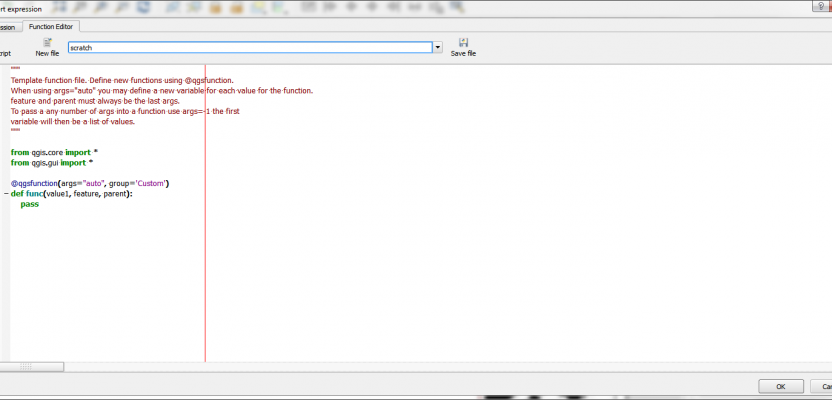
As with the date and time, create a textbox and open the expression editor. This time open the “functional editor.”
 Remove the scratch text and add the text:
from qgis.core import *
from qgis.gui import *
from qgis.utils import iface
@qgsfunction(args=’auto’, group=’Custom’)
def crsstring(stringformat, feature, parent):
settings = iface.mapCanvas().mapSettings()
if stringformat == ‘wkt’:
return settings.destinationCrs().toWkt()
else:
return settings.destinationCrs().toProj4()
Save this with a remember-able name and run. Nothing happens.
So, take this text:
[% crsstring(‘wkt’) %]
and paste it in the label textbox, like this:

… then refresh your screen. If you’ve done it all correctly, you should have all your coordinate system information as WKT.
What if you only want a selective bit of that information, or what if you want to display a couple of those pieces of information?
Nathan Woodrow kindly sent me this: QGIS API Documentation
Using this you can cater the script above to extract what you (might) need. Remembering that I need the EPSG, the documentation tells me that I need QString “AuthID” (bear with me on this). Note that I have only had success playing with the QString functions for this.
from qgis.core import *
from qgis.gui import *
from qgis.utils import iface
@qgsfunction(args=’auto’, group=’Custom’)
def authid(stringformat, feature, parent):
settings = iface.mapCanvas().mapSettings()
if stringformat == ‘wkt’:
return settings.destinationCrs().toWkt()
else:
return settings.destinationCrs().toProj4()
Note that this time instead of “def crsstring” I am using “def authid.” Even though I am still using the same text in the textbox, when I hit run script it provides me with the EPSG. It even has the text “EPSG” before it!

Okay, so now we are getting there! If I then open another new textbox and add the same “authid” script in again and change the references from “authid” to “description” (then save and run the script), I get the coordinate system description (change the main properties text to):
[%description(‘wkt’) %]
If you are still with me and understanding this, then you can see how this can be used to build an automated coordinate system box on your map in QGIS.
As always, let me know if you have any questions.
Many thanks to Nathan Woodrow for his patience!
Nick D