 In the last issue, we covered the idea of using a hobby drone as a test bed to learn about drones and get some low-cost, low-risk, hands-on experience. Now we’ll set up our Mambo FPV and take a few test flights.
Battery charging. The first step—after opening the box and ensuring you have all the necessary gear—is to start charging the batteries. Start with the Flypad (the joystick controller), as it can take up to two hours, then start charging the Mambo’s battery (or batteries if you bought more than one).
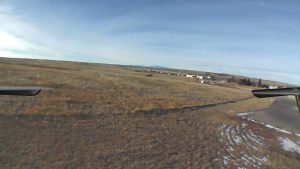
A shot from my Mambo FPV flight, with Pike’s Peak in the background.
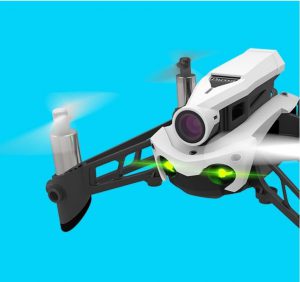
Camera. Insert the microSD card into the back of the camera and snap the camera into place on the top of the drone.
Setting up the app. Here’s a caveat. Although Parrot makes its FreeFlight Mini app available on both Android and Apple platforms, my experience was less-than-optimal on the Android side. This could be “operator error” as Parrot’s Mambo user forums are populated with folks who are successfully using the Android version of FreeFlight. I gave up after a few hours and switched to using my Apple iPad. It connected immediately, and I had no further connectivity or other app issues. So, to be on the safe side, if you’re considering purchasing this particular model, I highly recommend that you have access to an iPhone 6 or newer if you want to use Cockpit glasses, or an iPad if you don’t. Additionally, I’d strongly advise purchasing the Mambo FPV from a retailer with a consumer-friendly return policy; pay special attention to “return by” dates.
Once you’ve downloaded the app, make sure your smartphone or tablet has Bluetooth enabled. Connection is by both Bluetooth and WiFi. Once the app finds the drone via Bluetooth, you will be prompted to connect to the drone’s WiFi signal through your settings menu. Once the connection process is complete, you can begin flying.
Flying. Now comes the fun part: flying your Mambo FPV and capturing video and still images. For your first flight I suggest you find a place indoors without many obstructions. I used the inside of my garage. Also, while inside, keep the hulls attached to protect your props.
Flying can be done through your smartphone or tablet or using the Flypad and/or the Flypad with the Cockpit glasses. The Mambo is a blast to fly; it’s fast and agile, and its forward-facing HD camera provides surprisingly good imagery for only 720 HD.
Due to the small and lightweight nature of this drone, I would be very cautious flying outside in anything other than calm weather. Here’s a video demonstrating the Mambo in action in a breeze; note the leftward cant to the video as the drone tries to compensate for the wind.
On the positive side, that low (2.6 oz.) weight means no FAA registration required—one less thing to worry about.
For remote pilots who pay heed to all the caveats listed in this series, I’d say the Mambo FPV would make a great starter drone. And it’s a lot of fun, to boot!